There is often a trade-off, especially in software, between simplicity and customization. For example, you can build a website in Wix, WordPress, etc. in some five minutes with relatively limited design features, or you can build your very own, completely customize-able website from the ground up using HTML, CSS, Javascript, Python, the whole nine yards – and spend the rest of your life learning all of those programming languages. The same goes for Microsoft’s Excel. Sure, normal Excel is powerful as it stands – using only the buttons and menu options available – but it is practically untouchable when a user knows the ins and outs of every formula as well as VBA coding for macros. People with the right know-how have even made games in Excel!
My beginner experience with Blender has shown that it is not immune from this simplicity – v. – customization trade-off. I honestly don’t remember a piece of software that has been this customize-able. Then again, I don’t remember a piece of software that has driven me this crazy trying to figure out even the most simple of tasks. Even closing a sub window took TWO Google searches (tip: check here to find out how). So far, Blender = Customization = Complication = Frustration.
But, hopefully my trials and errors can help you in some way. I currently use Blender to create assets for Unity. It took me a while to figure out how, but I finally did. And I cannot imagine I’m the only one who has dealt with the untold frustration such a seemingly simple, but ultimately complicated, task has to offer. So I’d like to give you a top-level checklist of what to do along with some troubleshooting tips and links to video tutorials I found helpful.
The procedure I use to build Blender assets for Unity occasionally involves cycles rendering and texture baking. I have also heard of a process involving texture painting, but I have not touched that (see, already getting complicated; but also providing options, don’t forget).
Here’s what I do to get a Blender asset into Unity:
1. Finish your asset in Blender. Get your spaceship, crate, mayo bottle, whatever, into the shape you want. Get to the point where you’re ready to add materials/textures. Delete the light and camera in the scene.
2. Here’s where I branch off again. I have only used blender-generated materials in this process. So, using Blender materials, color your object however you want it. I have always used multiple materials and thus used the cycles rendering. My research has shown that you can use a Blender Render when using only one material, but I haven’t risked it and I like a variety of color anyway.
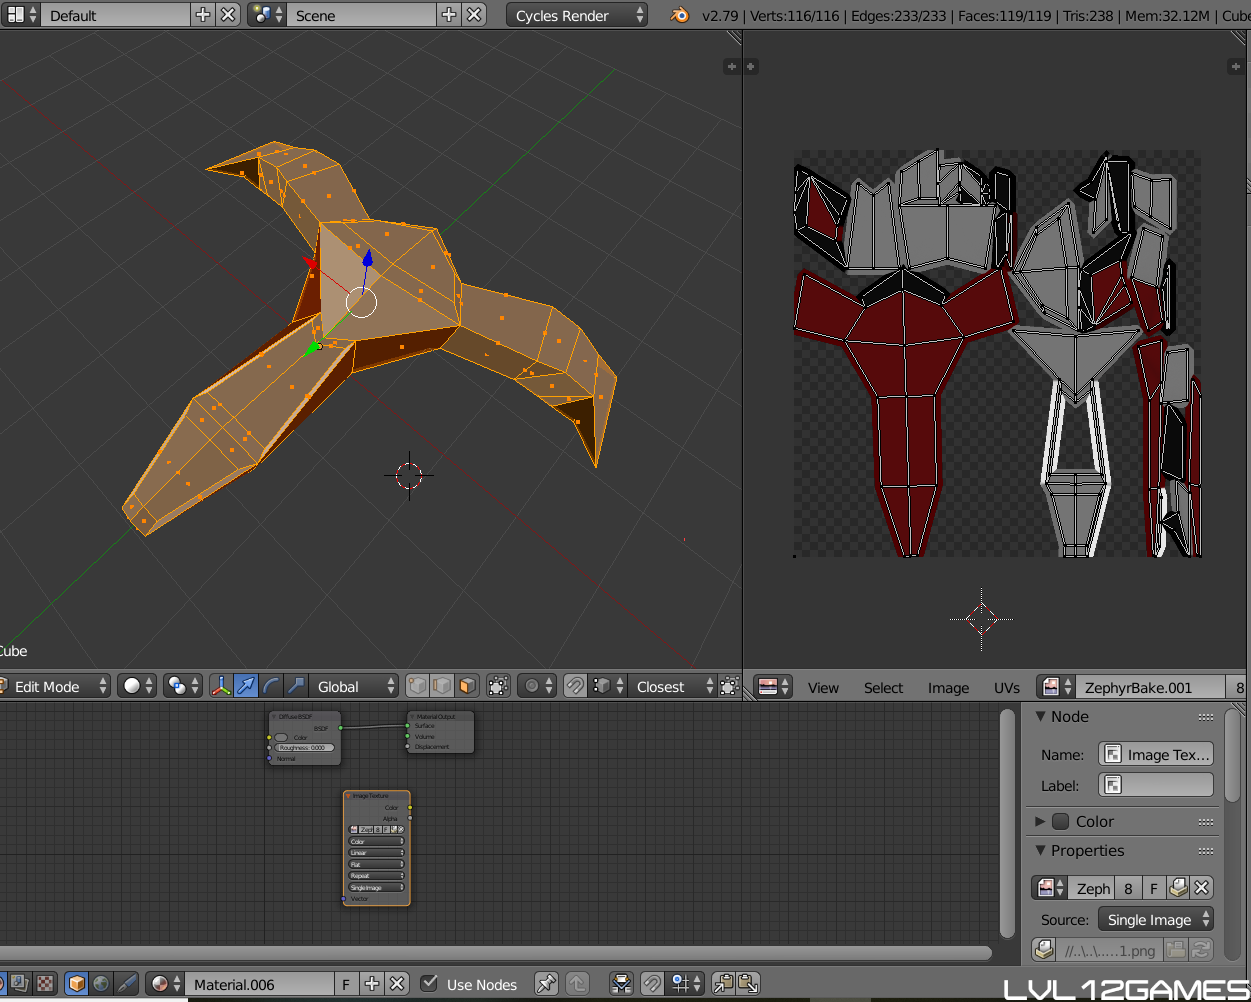
3. Once you have colored your object, prepare to do a UV unwrap. If you are using a mirror modifier, this would be the time to hit “apply”. We want a full UV unwrap. At the top of the Blender window, make sure you show “Cycles Render”. This option will often default to “Blender Render”, so change that if you need to. Grab the window expand icon in the top right of the scene view (see Fig. 1 below). and drag it down and to the left to create a new window. You should now see a mirror version of your object.

4. Now, in this new window, change the current editor type to “UV/Image Editor”. Click the icon to the left of “View” on the bottom toolbar to do this. It will open a menu. The “UV/Image Editor” mode will have an icon that looks like a landscape photo. After changing the mode, the window will show a blank square. In the bottom ribbon, hit “Image”, “New Image”. Name the image.
5. Back in the scene with the object, enter Edit mode and hit A to select the entire object (if you already had something selected on the object hit A twice – first to deselect, second to select all). Hit U and select “Smart UV Project”. This should take every face of your object and “unwrap it” into a 2D image on your UV/Image Editor window.
6. As you did to create a window with the “UV/Image Editor”, drag another window open. I usually like to open one at the bottom of the first two. Take a look at the featured image to see what I mean. Change this view to “Node Editor” using the same list that held the “UV/Image Editor” view. In that view, in the bottom toolbar, click the globe. Select the option to “Use Nodes” and the two nodes in the “world” will appear. Change the color in the background node to white.
7. Click the cube next to the globe. You’ll have to do the following for each material: In your materials menu, select the first material. Its nodes will appear. Click “Add” in the bottom toolbar of that screen, Texture, Image Texture. A new node will appear. You do not have to connect it to the others, but make sure you select the same image for this node as you have open in the UV map screen.
8. Right click this new node and copy it. Then open each of the other materials and paste this same node into each one.
9. After that, you should be ready to bake. In the vertical toolbar with the materials, there will be a little camera button. Click that to open the bake menu.You should be able to scroll to the bottom, expand the “Bake” section and hit the “Bake” button. Fingers crossed, it should work right away. If not, check out the resources below to troubleshoot. Or comment this post and I will troubleshoot with you.
10. Once your baking is complete, Select “Image” in the bottom ribbon of the UV map screen. Select “Save As Image” and save the new baked texture map wherever you know to find it. Your baking is complete!
Some Troubleshooting and Resources:
- My main tip is to use the default options in Blender. Default materials, default baking, everything. If you changed anything, that’s likely what is causing any issues you have. Start with the defaults, and THEN change things up. But the most important thing, I think, is to get it to work first. Get that moral victory.
- For any issues that arise during baking, an error description will appear in the top ribbon of Blender. Google that description and see what pops up. Feel free to comment it here as well and I will see if I have any insight.
- Thank you so much to this tutorial from J. Werner for helping me figure out a slew of issues with my own baking endeavors. I recommend checking it out when dealing with nodes.
-LVL12GAMES